How to apply for your NBI Clearance online
Summary
- Sign up for a new account on the NBI website.
- Fill up an online form.
- Apply for clearance: schedule your appointment and select the type of clearance and payment method.
- Pay the processing fee.
- Verify that your payment was processed correctly.
- Print the application form.
- On the appointed date, proceed to the NBI office.
Rough Spots
The first one concerns the name of a married female who is trying to register as a new user in the system.The second concerns payment. For the payment method we selected, we were presented with so many instructions in the form of screen popups, as you will see below. They were all intended to help us, of course. But seeing it all for the first time was a bit overwhelming. Before you do this for real, take a look at the screenshots below.
Third, I was told to come back for my clearance later. This was because some of the information I entered into the online form matched one or more active cases that the NBI had on file. They needed more time to clear me.
The Process in Detail
From here on you will see a lot of computer screenshots.Step 1: Sign up for a new account
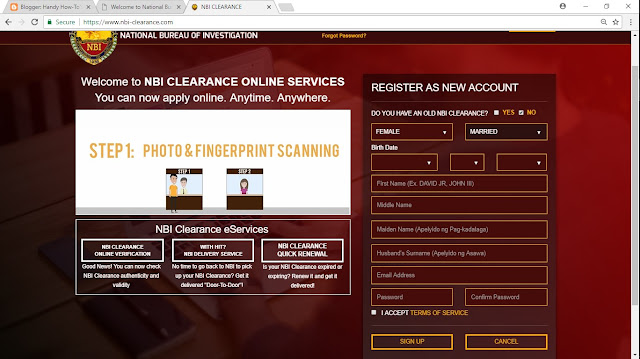
Open a browser on your computer and go to the NBI website. When NBI's home page finishes loading, scroll down to the image that says, "NBI CLEARANCE SIGN-UP NOW" and click it.A new page like the one below will open.
If you already have an account, log on and skip to Step 2. If not, sign up for a new account by filling up the fields under "REGISTER AS NEW ACCOUNT" on the right-hand side of the page:
For the question, "DO YOU HAVE AN OLD NBI CLEARANCE?" by taping "No" if your old NBI clearance was issued before 2014 or if you never had one before.
As you select your gender and civil status from the drop-down boxes, the fields to be filled up below them will change accordingly. The screenshots below are for a married female.


Handy Tip #1 For Married Females
- Here's how to fill up your name:
- "First Name" means your first name (e.g., Alice).
- "Middle Name" means your middle name when you were single.
- "Maiden Name" means your surname when you were single.
- "Husband's surname" means your married surname.
Handy Tip #2 For Married Females
In the popup above, you will find your maiden surname across the LAST NAME field instead of what one would normally expect, which is your married surname. Don't worry. Just continue with the registration. You will find out later in the process that your first name, maiden surname and married surname have all been stored in the system correctly.
Step 2: Fill up the online form
After you log on, a page that looks like this will appear. Enter the data requested and then click the "SAVE INFORMATION" button at the bottom of the form.
Step 3: Apply for clearance
The page like the one below will appear:
Take a moment to review all the data, and then click the "APPLY FOR CLEARANCE" button near the upper right corner of the page. If you need to edit the data, click the EDIT INFORMATION button.
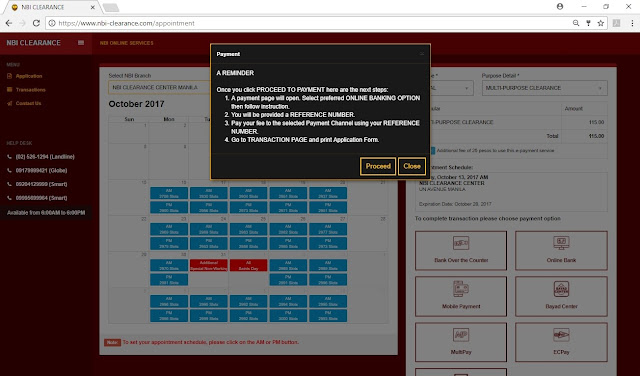
After you click the APPLY FOR CLEARANCE button, a screen like the one below will appear.
Using the drop-down menu atop the calendar, select the NBI office where you want to go. Then click on one of the blue buttons on the calendar to schedule your appointment. On the right-hand side of the page, select your purpose, purpose detail and mode of payment. For mode of payment, click "Online Bank," as the examples presented in Steps 4 and 5 are for online banking.
If you prefer to pay via another method, click the appropriate button, perform the payment process and then skip to Step 6.
Step 4: Pay the processing fee
The discussion that follows applies to the "Online Bank" mode of payment via BDO Internet Banking.After clicking the "Online Bank" button, this popup will appear. It is just a summary of what is going to happen next. Click the "Proceed" button.
Another popup summarizes the transaction you are about to make. Click the "Proceed to Payment" button.
The next popup prompts you to select a payment channel. Select "BDO Internet Banking" from the drop-down menu and then click the "Select" button.
In the next popup, click on "view and save the instruction online."
A new page will open. This is a very important page, so be careful not to close it. Better yet, take a moment to bookmark, print or save a copy of this page. Then, click "Login to BDO RIB" under Step 1, Item 1.
This will open BDO's Internet banking web page. Log on to your account.
On the left-hand menu, select "Send Money" and then "To any BDO Account (P10,000 limit)"
Referring to the Payment Instructions web page, enter the data requested as shown below. Then, click the "Submit" button.
Complete the payment process as illustrated in these screenshots:
IMPORTANT: Copy the transaction reference number before logging out of the BDO website.
To illustrate, let's say that BDO provided the following transaction reference number:
PC-20171012-01234567
We will need the last 7 digits of this reference number later.
A popup will prompt you to enter the last 7 digits of BDO's transaction reference number. From our hypothetical example, "PC-20171012-01234567," we take 1234567, enter it into the blank field, and then click the "Validate" button.
You should soon get another popup telling you that your payment has been validated. Unfortunately, I am unable to show you a screenshot of this popup.
At this stage, you have completed the payment process.
PC-20171012-01234567
We will need the last 7 digits of this reference number later.
Step 5: Verify that your payment was processed correctly
After completing your payment, wait for around five minutes. Then, go back to the Payment Instructions web page and click on the link under Step 2, as shown below.At this stage, you have completed the payment process.
Step 6: Print the application form
After completing your payment, go back to the NBI web site and sign in.
Click "Transaction" on the left-hand side of the page. The status of your application should now be indicated as "Paid."
Click on "Details" on the right-hand side of the page.
A summary popup like the one below will appear. You will need the reference number when you go to the NBI office, so copy it on a piece of paper and/or take a picture of it with your smartphone. And, just to be doubly sure, click "Print Application Form" to print a copy of your application form. After printing the application form, click "Close." Proceed to Step 7.
If the status is not yet "Paid," follow Step 3, Item 2 of the payment instructions web page:
Step 7: On the appointed date, proceed to the NBI office.
Be sure to follow the handy tips below, and you're all set!Handy Tips
- Remember to bring the application form and your valid ID.
- Get an appointment early in the morning to avoid long lines, high heat and humidity, and frayed nerves at the NBI office.
- Dress decently. No to shorts. No to undershirts. No to slippers.
- Escorts are not allowed inside the NBI office, so plan on going in there by yourself.
- If you are asked to come back a few days later for your clearance, there's a good chance that you will have to sign an affidavit and affix your fingerprint to it. Bring a packet of wet wipes so that you can wipe the ink off your finger.


Comments
Post a Comment